
Overview
Contact Profiles
Every contact builds a history. See their event attendance, communication records, and custom-field changes in one all-new Timeline view, accessible from an event guest list. Give your team a customizable dossier to print or share by password-protected link.
Know the person behind every RSVP.
A guest’s dietary needs, past attendance and the note from your colleague belong together. See their list memberships and campaign history alongside those details, with the context you need before the next conversation.
History across Gatsby
Timeline brings event activity, communications and profile updates into one chronological view, so you can see what happened before you follow up.
A dossier for your team
Choose the contact details and event history your team needs. Print the dossier for a host or share a read-only link with optional password protection.
Viewing contact profiles
Section titled “Viewing contact profiles”Click a name in Contacts, an event guest list, or a list to open the profile drawer. You see the same contact details wherever you open the profile. The instructions below describe the desktop web profile.
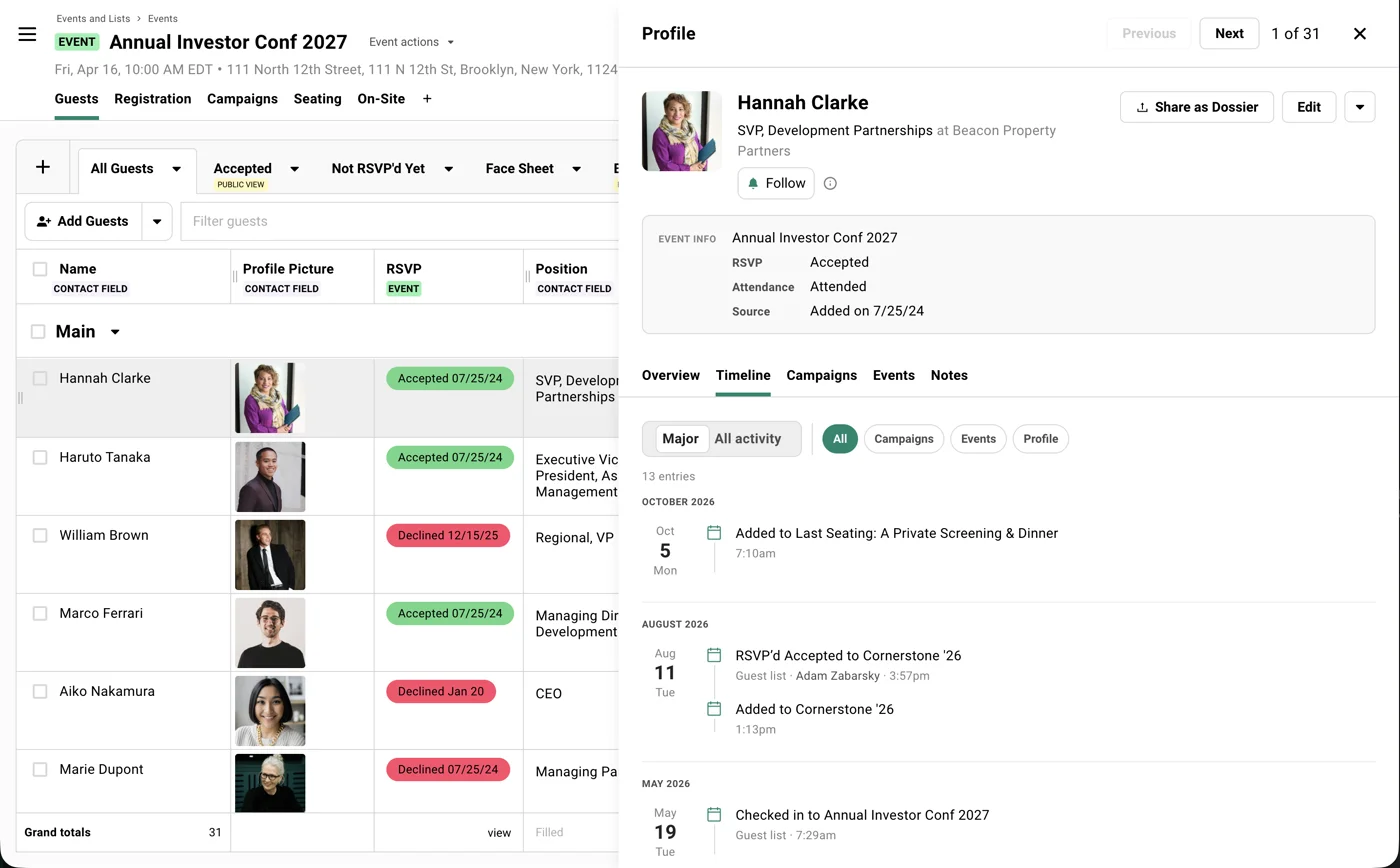
Overview brings the contact’s details into labeled sections. Timeline shows recorded activity. Your profile template controls which other tabs and Overview sections appear.
Opening a profile and moving between contacts
Open Contacts and click a name, or click a guest’s name on an event’s guest list. The Guests step of a quick event also opens the contact profile.
Use Previous and Next at the top of the drawer to step through the table you opened it from. The counter shows your place in that table. Close the drawer with the X.
The contact’s name, company and position stay at the top. A Context note, when present, appears below them. Use Edit to update the contact, or the arrow beside it to open Contact actions, including Add to Event and Add to List.
What's in Overview?
| Section | What it shows |
|---|---|
| Identity | Company, position and personal details, including dietary restrictions. |
| Reaching them | Primary email, other emails, phone and address. Use the copy button beside the primary email to copy it. SMS consent is read-only. |
| Contact method groups | Named To and CC combinations for campaigns. |
| Associated contact to CC | The person copied on campaigns by default, who can also receive automatic RSVP confirmations. Campaign settings can exclude them. |
| Links | Website and LinkedIn links. |
| Email preferences | Event and transactional email subscription state, plus individual event opt-outs. Newsletter subscriptions are separate. |
| Tags | Contact labels used across events and lists. |
| Custom fields | Your org’s custom fields that have a value for this person. Expand the remaining values when additional fields are collapsed. |
The template controls section visibility and order. Hiding a section leaves its data on the contact. Create new custom fields in Contacts » Custom Fields.
Finding the other tabs
Overview and Timeline always appear first. The starting layout also shows Events and Notes; your org’s template may differ.
| Tab | Use it for |
|---|---|
| Events | Event memberships, RSVP status and attendance. Quick event rows open the quick event when you have access. |
| Campaigns | Email campaign history, including quick event invitations and follow-ups. |
| Lists | The contact’s list memberships. |
| Notes | Team or private notes, with titles and optional event links. |
| Files | Documents attached to the contact. |
| Newsletters | Newsletter subscriptions and engagement when your org has the Newsletters add-on. See Newsletter Subscribers. |
| Integrations | Salesforce and Affinity identifiers, copy buttons, last successful sync and expandable sync history. |
Campaigns, Lists, Files, Newsletters and Integrations are hidden in the starting layout. Show any of them by editing your profile template. See Where did the Campaigns tab go? for the steps. The available tabs depend on your org’s features.
Editing contact details
-
Open the profile and click Edit.
-
Update the relevant fields, such as company, dietary restrictions or custom fields.
-
Click Save to keep the changes, or Cancel to leave the editor.
You are editing the shared contact record, including when you opened it from an event. Context note is one note for the contact across Gatsby; use the Notes tab for separate entries about conversations or events.
Some edits depend on your team’s permissions. If a field is unavailable, ask an Admin on your team. See Team & Permissions.
For updates across many contacts, use CSV import.
Other emails and email preferences
Other emails are alternate addresses for the same person. Gatsby uses them to match an incoming guest to an existing contact and avoid duplicates. Adding an address here does not add it as a campaign recipient. Use a Contact method group to choose a different To address or CC combination.
Email preferences separates the contact’s overall event and transactional email state from opt-outs for individual events. The checkbox in Edit labeled Unsubscribe from all email communications controls event and transactional email. Manage newsletter subscriptions on Newsletters, and see SMS Consent & Compliance for text messages.
Merging duplicate contacts
Select the duplicate contacts in Contacts or on a guest list, then choose More Options » Merge Contacts in the green action bar.
Event history merges with the contact. You do not need to add both records to the same event first. Check each pair before merging; similar names do not always identify the same person.
Reading the Timeline
Section titled “Reading the Timeline”The Major view includes activity such as invitations, RSVP changes, check-ins, notes and email bounces. Switch to All activity to also see campaign, newsletter and SMS sends, opens, tracked link clicks and other recorded updates.
Older activity is still being added to Timeline. A blank or partial Timeline does not mean the contact has no event or campaign history. Check the Events and Campaigns tabs while historical activity is being added. Campaigns is hidden in the starting layout. See Where did the Campaigns tab go? to show it.
Filtering and expanding activity
-
Open a contact and choose Timeline.
-
Choose Major or All activity.
-
Choose a channel to narrow the feed, or All to clear the channel filter. Channels appear only when the contact has activity for them.
-
Expand a grouped entry with Show all to see its individual rows. Use Load more at the bottom for older entries.
Channels include Events, Campaigns, Lists, Newsletters, SMS, Notes, Files and Profile, where activity is available. Entries show the recorded time and, when known, who made the change. A campaign marked sent is not a delivery receipt.
Why is some activity missing?
First choose All activity and clear the channel filter. Major leaves out campaign, newsletter and SMS sends, opens, tag changes, and field updates from CRM syncs. Invitations are included in Major.
Historical activity is being added during rollout. Field-change history starts when change tracking was introduced; older before-and-after field values cannot be reconstructed. The Timeline is a record of the activity Gatsby has captured, not a complete audit of every past interaction.
Following a contact
Section titled “Following a contact”Following a contact adds their major activity, such as RSVP changes, check-ins and notes, to your weekly email digest. Stay up to date between visits to Gatsby.
Managing follows and the digest
You receive one weekly email summarizing major activity for the contacts you follow in that org. Gatsby skips the digest when there is no activity to report. Following does not send an email for each individual change.
Your follows are personal and do not change which contacts your teammates follow.
In Settings » Notifications, Followed contacts digest controls the weekly email and lists the contacts you follow. Turning off the digest keeps your follows. Muting all notifications also stops the email.
Click Follow beneath a contact’s name to start following them, or Following to stop. Following is not available to External Collaborators.
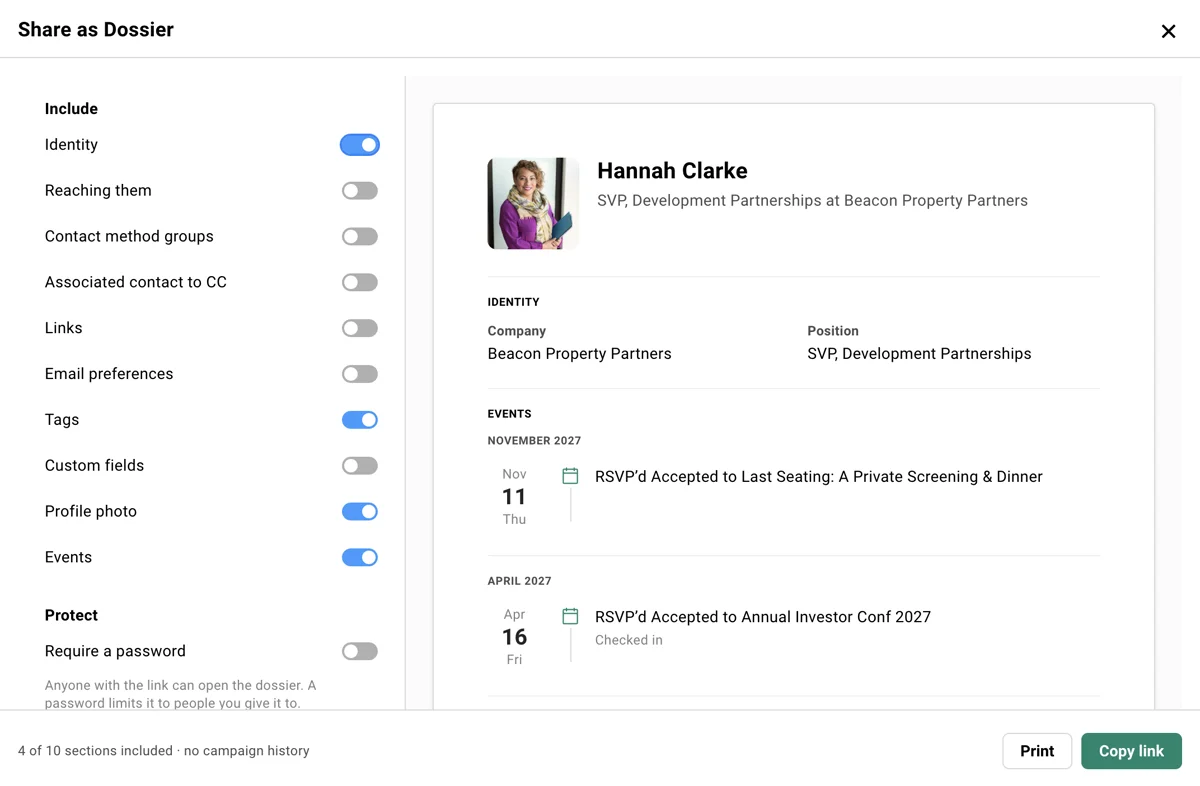
Open Share as Dossier at the top of a profile to choose the details your recipient needs.
Creating a dossier link
-
Open Share as Dossier.
-
Under Include, select the sections to share. Options include contact details, custom fields, the profile photo and Events. Empty sections do not appear in the document.
-
Turn on Require a password and enter one if the recipient should need a password to open the link.
-
Keep In 30 days on to expire the link after 30 days, or turn it off for a link with no expiry.
-
Review the preview, then click Copy link. Send the link to your recipient, and give them the password if you set one.
Anyone with an unprotected link can open it without a Gatsby account. Copy link creates the share; opening the dialog and choosing sections does not.
The link uses your selected sections and loads the contact’s current details when opened. It is not a frozen copy. Choosing different options and copying again creates a new share rather than changing a link you already sent. A link cannot open while the contact is archived. Dossier sharing is not available to External Collaborators.
The name, company and position remain on the cover. Internal Context note, Notes, files, integration logs and campaign history are not included.
Printing or saving a PDF
Open Share as Dossier, choose the sections, then click Print. Use your browser’s print dialog to print the document or save a PDF.
Print uses the dossier preview. It does not print the entire contact drawer, and you do not need to create a share link first. If Events is selected, the document includes event memberships with RSVP and recorded attendance information.
Editing sections and tabs
Section titled “Editing sections and tabs”-
Open Contact actions » Manage profile templates….
-
Choose Edit sections and tabs…. The editor opens on the contact’s Overview.
-
Click an optional tab to show or hide it. Drag optional tabs to change their order. Overview and Timeline stay first and cannot be hidden.
-
Use each section’s up and down arrows to move it, or its eye button to show or hide it. Custom fields always uses the full width.
-
Click Save template to keep the layout, or Cancel to discard your changes.
Saving changes the layout for everyone using this template. Duplicate the template first when you need a separate layout. Changing the layout does not change the contact’s field values.
Creating and managing templates
Section titled “Creating and managing templates”Go to Contacts » Profile Templates to see saved layouts, the org default and how many people use each template. Choose New template to name a layout and edit it on a real contact.
A template’s menu includes Edit sections and tabs…, Rename…, Duplicate, Set as org default and Delete. The profile’s Manage profile templates… menu offers these actions too.
The org default is the fallback for people who have not picked another template. Deleting a template returns its users to the org default. If you delete the default, the oldest remaining template becomes the default. Gatsby keeps at least one template.
External Collaborators cannot manage org profile templates. Use desktop web to edit a template.
Switching your profile template
Section titled “Switching your profile template”-
Open a contact profile and click the arrow beside Edit.
-
Choose Switch profile template….
-
Select a template. A check marks the one you are using.
Gatsby remembers your choice for your account in this org as you open other contacts. If you have not chosen one, Gatsby uses the org default.
Notes for your team or yourself
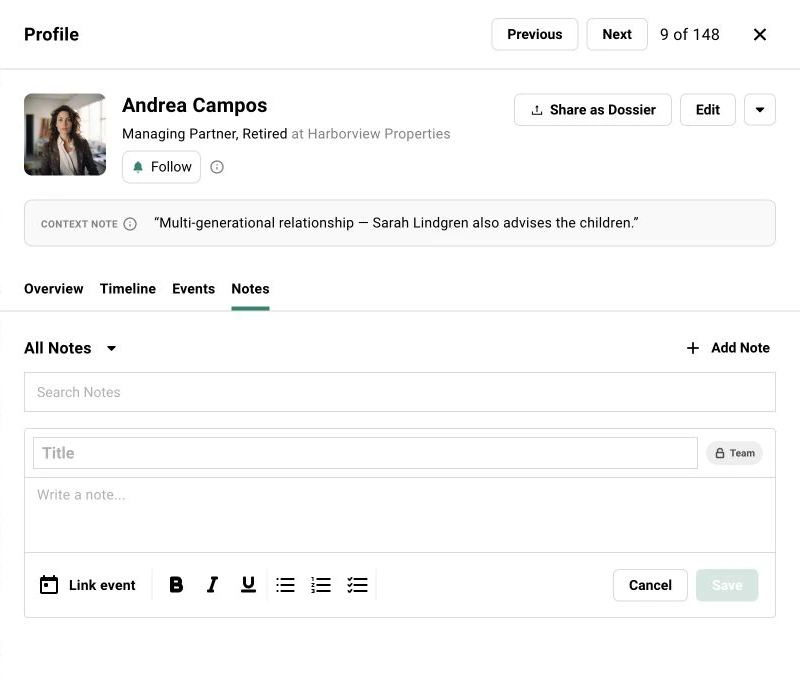
Section titled “Notes for your team or yourself”Use Context note for a shared reminder beneath the contact’s name. Add or edit it through the profile’s Edit form. The Notes tab holds separate Team or Private entries about conversations and events.
Adding or editing a Context note
-
Open the contact profile and click Edit.
-
Find Context note, with the prompt Who is this person to your team?
-
Enter or update the reminder.
-
Click Save.
The Context note appears beneath the contact’s name across the profile tabs. Adding an entry in Notes does not change this field.
Writing, linking and pinning notes
-
Open Notes and click Add Note, or use the empty note editor shown when there are no notes.
-
Enter a title and write the note. If you leave the title blank, Gatsby uses the save date and time.
-
Set the visibility to Team or Private. Team notes are visible to your team; private notes are visible to you.
-
Use Link event if the note belongs with a specific event.
-
Click Save.
Use a saved note’s menu to pin it. Pinned notes appear first. The filter includes All Notes, Pinned Notes and Your Notes, and the search field finds notes by their text.
Contact method groups
Section titled “Contact method groups”Fund communications need the wealth manager CCd. Holiday party invites don’t. Some contacts want correspondence at their personal email, not their work address. There’s no single rule that works for every send.
Contact Method Groups let you create named groups with different To and CC combinations. Select which group to use when sending campaigns.
Choose a contact method group for the campaign you are sending. Use an associated contact when the same person should also receive automatic RSVP confirmations.
Creating a contact method group
-
Open the contact profile and click Edit.
-
Find Contact method groups.
-
Click Add another group.
-
Name it descriptively: “Work Only,” “Personal + Spouse,” “Executive + Wealth Manager.”
-
Add the recipient names and email addresses under To Emails and CC Emails. Include at least one To recipient.
-
Click Create. This saves the group immediately. Use Update when editing an existing group.
Using contact method groups in campaigns
When viewing campaign recipients, a dropdown appears next to each contact name. Select which group to use for that send.
Select a named group to use its To and CC combination. If no selected or default group applies, Gatsby uses the contact’s primary email.
Setting a default group
Mark a group as the contact’s default to use its To and CC combination. A group selected for that recipient, or the default group set for the event or list, takes priority over the contact’s default.
Useful when you almost always want to use a specific combination but occasionally need to override it.
Importing contact method groups
Create a group on the profile for an individual contact. For a batch of invitations with different CC recipients, build the groups from a CSV.
-
Prep your CSV. One row per contact, with a column for the contact’s primary email, a column for the To address(es), and a column for the CC address(es). Separate multiple addresses in the same cell with semicolons.
-
Upload it. Open the event, list, or Contacts page, click the Add Guests or Add Contacts dropdown, and choose Upload CSV.
-
Map the columns. Map the primary email to Primary Email, then map the To and CC columns to two new Custom Text Fields.
-
Create the groups. Once the import finishes, select the guests on the list, then choose More Options » Create Contact Method Groups. During this process, you select which fields represent the To and CC email addresses for the Contact Method Group.
The groups appear on each guest’s profile and become selectable from the recipient list in any campaign. Leave the new groups unset as the default so a one-off CC arrangement doesn’t apply to future sends.
Contact method groups do not apply to confirmation emails. Use an associated contact to include someone in CC on automatic confirmations.
Associated contacts
Section titled “Associated contacts”Associate an EA or assistant with an executive to copy them on campaigns by default. When the executive RSVPs through their personal invitation, Gatsby also copies the associated contact on the confirmation if one is sent. Configure this on the contact profile once.
For campaigns, the Include associated contacts to cc setting controls whether associated contacts are included. Turning it off does not remove CC addresses explicitly saved in a selected contact method group.
Adding an associated contact
-
Open the contact profile by clicking their name.
-
Click Edit in the top right corner.
-
Find the Associated Contact to CC field.
-
Search for and select the person to auto-CC.
The person must already exist as a contact in Gatsby.
-
Click Save.
Campaigns include the associated person unless that setting is turned off.
You can import to this field using the CSV import option on a guest list.
Whether Gatsby sends a confirmation and includes a calendar invite depends on the event’s settings and the guest’s RSVP status.
Custom field types
Section titled “Custom field types”Three field types serve different purposes.
Text fields
Free-form text entry. Good for biographies, notes, or unique strings that do not need categorization.
Use Multiselect when you want everyone to choose from the same set of categories.
Multiselect fields
Dropdown with predefined options. Filterable and sortable on guest lists.
Use for guest tier, investment focus, relationship owner, event attendance tracking, or anything you want to segment by. Add options as you need them.
Number fields
Numeric values that roll up in guest list totals. Use for allocation amounts, ticket counts, or anything you want to sum across guests.
Managing custom fields
Section titled “Managing custom fields”Create custom fields in Contacts » Custom Fields. They are available across your org. Overview shows fields with a value when the template includes the Custom fields section.
Creating custom fields
-
Go to Contacts in the main navigation.
-
Click the Custom Fields tab.
-
Click Add Field.
-
Choose the field type: Text, Multiselect, or Number.
-
Enter a Title and add options for a Multiselect field.
-
Click Create Field.
The field is now available to fill in on contact profiles and to add as a guest list column.
Editing and archiving fields
Return to the Custom Fields tab in Contacts. Click any field to rename it or update options.
Archive fields you no longer need. Archived fields hide from profiles but data is preserved.
Creating fields during import
You can also create custom fields during CSV import. Map a column to “Create new field” and Gatsby creates it automatically with values from your spreadsheet. These behave identically to fields created directly in Custom Fields. They show up there afterward.
Contacts overview
Section titled “Contacts overview”All Contacts lists active contacts regardless of which events they attended. Search by name to find a contact.
All Contacts: views and filtering
Create views with filters, columns and sections. Views can include contact details and event RSVP history. Use an event’s guest list to work with that event’s RSVP and check-in information.
Filter by custom fields to find segments. “Show me all contacts tagged VIP with Investment Focus containing Growth Equity.”
Custom Fields
Create, rename and archive your org’s custom fields. The profile template controls whether Overview shows the contact’s populated fields. See Managing custom fields above.
Profile Templates
Manage the shared layouts for contact profiles. See Customizing your Profile view for switching layouts and editing sections and tabs.
Imports
See all CSV imports your team has performed, across every event, list, and the Contacts database itself. View what was imported, to which event, and when. Download original files if you need to reference them.
Deleted Contacts
Archiving a contact moves them to Deleted Contacts. Open an archived contact and use Restore to return them to the active contact database.
Removing someone from a guest list only removes them from that event. Their contact profile remains in your database.
Common questions
Section titled “Common questions” Where did the Campaigns tab go?
Campaigns is still available. The starting profile layout hides it, along with Lists, Files, Newsletters and Integrations. Show it again from any contact profile:
-
Open a contact profile and click the arrow beside Edit to open Contact actions.
-
Choose Manage profile templates…, then Edit sections and tabs….
-
Click Campaigns in the tab row to show it. Drag it to where you want it.
-
Click Save template.
Saving changes the layout for everyone using this template. To show Campaigns only for yourself, go to Contacts » Profile Templates, choose New template, show Campaigns and save. Then switch to it with Contact actions » Switch profile template….
How is this different from using a CRM for event contacts?
CRMs track deals and company relationships. Gatsby tracks event relationships: who attended which dinners, who RSVPs yes but never shows, who needs vegetarian options.
With Salesforce or Affinity configured, Gatsby can sync supported contact and event data. What syncs depends on your integration setup. See Salesforce and Affinity.
Can I import existing contacts with custom fields?
Yes. Create your custom fields first, then import a CSV with columns mapped to those fields. Or create fields during import by mapping columns to “Create new field.”
Can I add multiple associated contacts to auto-CC?
Currently, each contact supports one associated contact for auto-CC. For more complex scenarios, use Contact Method Groups where you can include multiple CC addresses per group.
What happens to contact data when I delete someone from an event?
Removing someone from a guest list removes them from that event only. Their contact profile stays in your database. They remain on other events and lists.
To archive the contact itself, use Contacts or Contact actions » Archive contact.
How do I add custom field data to existing contacts?
Three options: edit profiles individually, import a CSV with email addresses and the custom field values, or link survey questions on standard events to contact custom fields so guests can supply the values. Quick event answers stay with that event.
Why didn't registering through the public link update a guest's name?
When someone registers through a public link with an email address that already belongs to a contact, Gatsby matches them to that contact without overwriting its first and last name, even if those fields are blank.
Custom fields work differently: on a standard event, a registration question explicitly linked to a contact custom field can save its answer to that field, including through public registration. Quick event answers stay with the event.
To collect an updated name, gather it as a registration answer and apply it yourself with a CSV import:
-
Add a short text question to the registration form, for example “Preferred name for name badge.”
-
Once responses are in, set up a guest list view with the Email column and that question’s column visible.
-
Select the guests, then Export.
-
Re-import the file through Add Guests » Upload CSV, mapping Email to the email column and the answer column to the contact field you want to update. Choose the spreadsheet value when the importer shows conflicts.